Android N新特性-Notification快速回复


前言

Android N引入了一些新的API,其中增加了快速回复,捆绑通知,自定义视图和消息样式,这篇文章主要给大家讲一下快速回复功能是如何实现的。

首先我们利用Button的点击事件去触发添加一个Notification,代码如下:

MainActivity.Java

1
2
3
4
5
6
7
8
9
10
11
12
13
14
15
16
17
18
19
20
21
22
23
24
25
26
27
28
29
30
31
32
33
34
35
36
public static final String KEY_TEXT_REPLY = "key_text_reply";//获取快速回复内容的key
public static final int NOTIFICATION_ID = 100;
......
private void addNotification(){
String replyLabel = getResources().getString(R.string.reply_label);
//创建一个远程输入(既:通知栏的快捷回复)
RemoteInput remoteInput = new RemoteInput.Builder(KEY_TEXT_REPLY)
.setLabel(replyLabel)
.build();
//点击快速回复中发送按钮的时候,会发送一个广播给GetMessageReceiver
Intent intent = new Intent(MainActivity.this,GetMessageReceiver.class);
PendingIntent pendingIntent = PendingIntent.getBroadcast(this,0,intent,
PendingIntent.FLAG_ONE_SHOT);
//创建快速回复的动作,并添加remoteInut
Notification.Action replyAction = new Notification.Action.Builder(
R.drawable.ic_chat_blue_24dp,
getString(R.string.label), pendingIntent)
.addRemoteInput(remoteInput)
.build();
//创建一个Notification,并设置title,content,icon等内容
Notification newMessageNotification = new Notification.Builder(this)
.setSmallIcon(R.drawable.ic_account_circle_white_24dp)
.setContentTitle(getString(R.string.title))
.setContentText(getString(R.string.content))
.addAction(replyAction)
.build();
//发出通知
NotificationManager notificationManager =
(NotificationManager) getSystemService(NOTIFICATION_SERVICE);
notificationManager.notify(NOTIFICATION_ID, newMessageNotification);
}

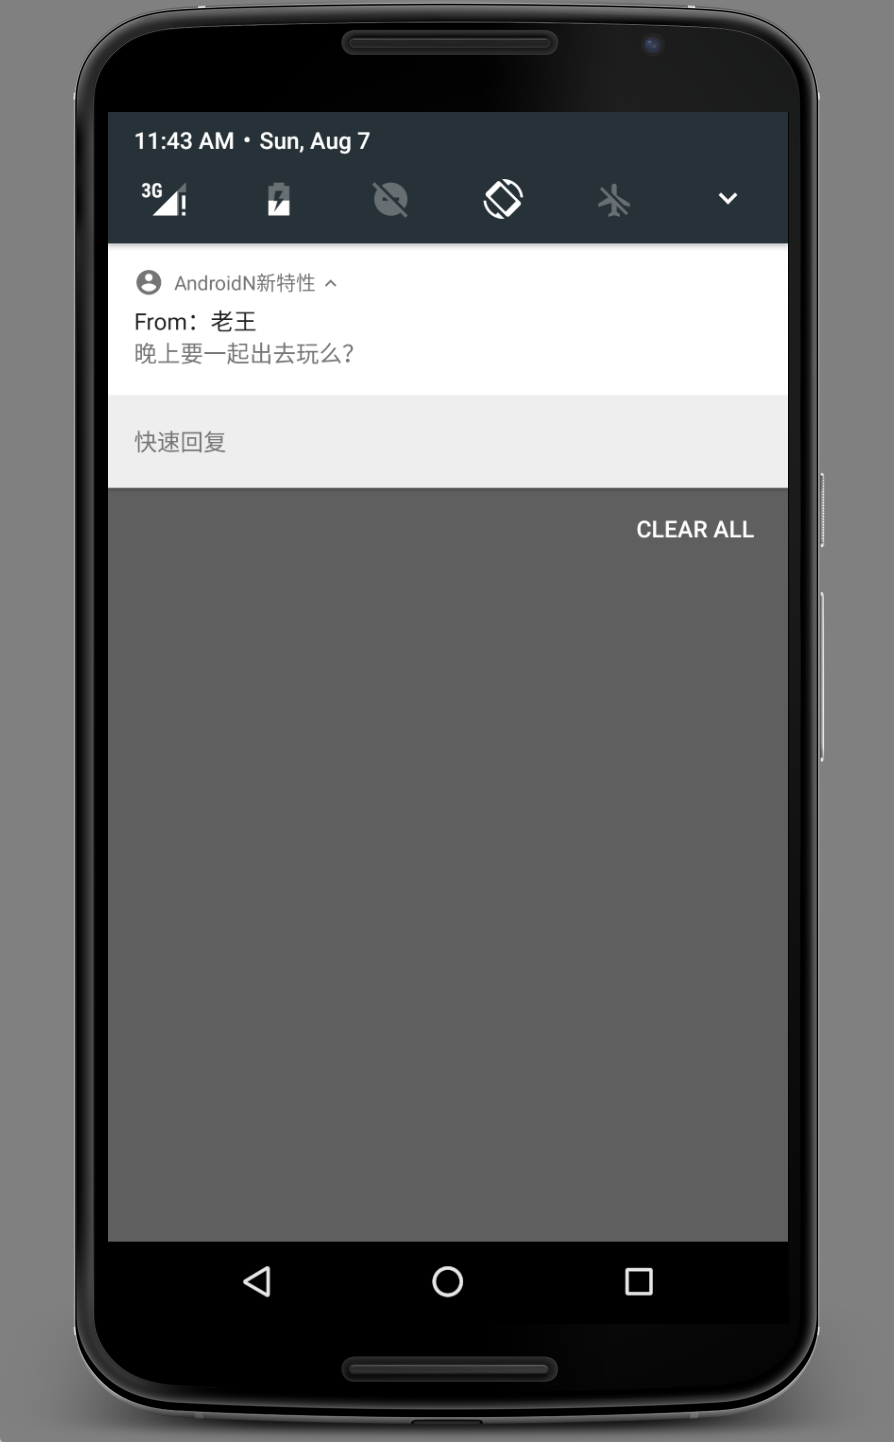
上面的代码写好之后,我们点击Button,通知栏就会弹出一个Android N风格的Notification,如下图:

cmd-markdown-logo

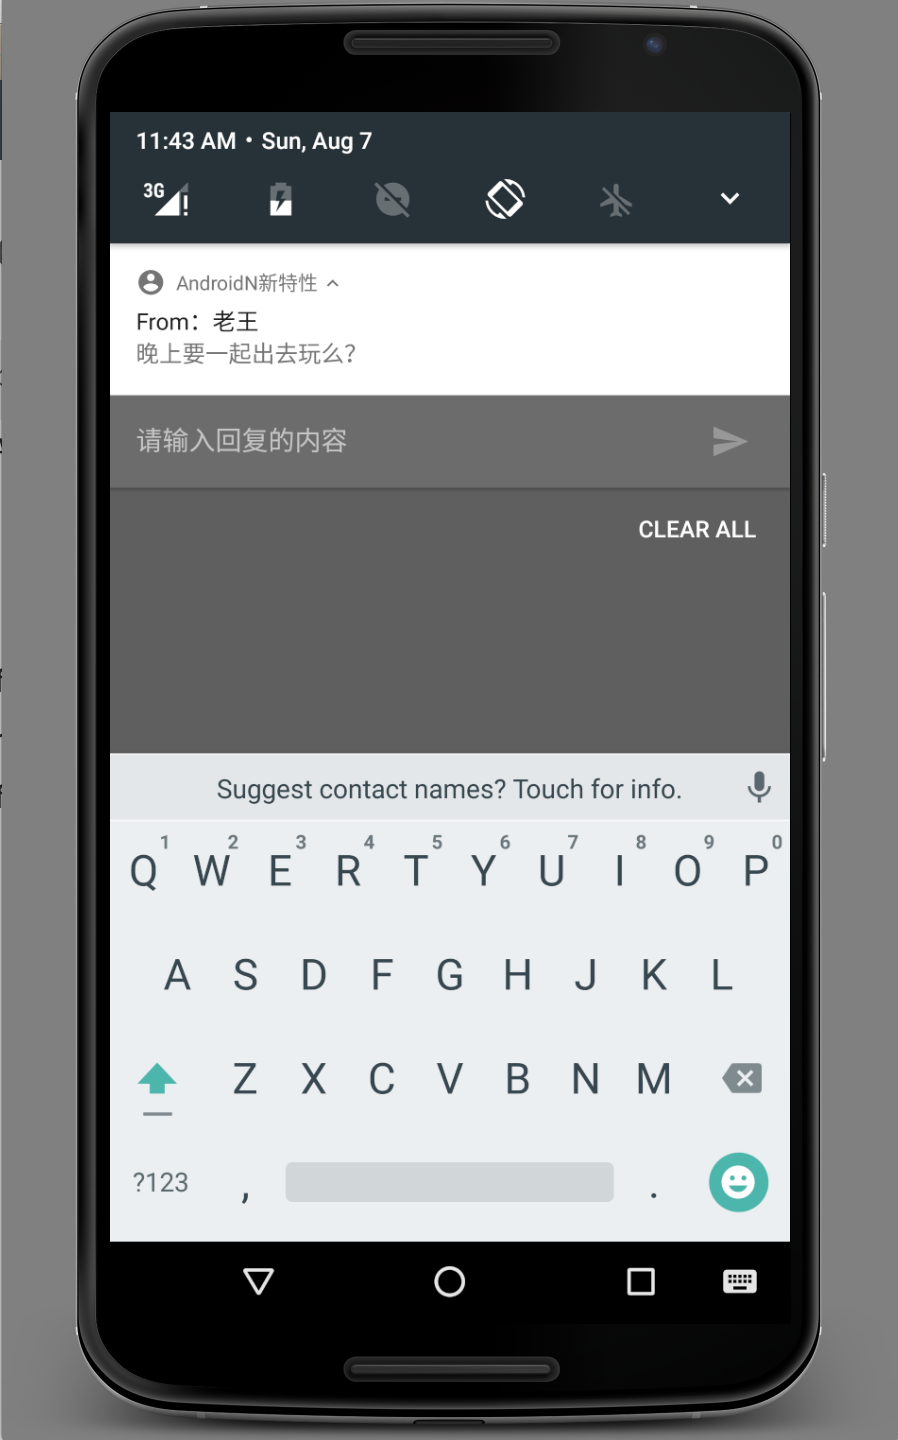
点击Notification中的快速回复按钮,就会弹出一个编辑框,让用户输入要回复的内容,如下图:

cmd-markdown-logo

到这里,我们的Android N特性的Notification就添加完成了,下面再说一说如何获取快速回复中的内容。上面我们设置了一个pendingIntent,这个pendingIntent的作用就是当用户点击发送的时候,会发送一个广播出去,GetMessageReceiver就会接受到这个广播,我们可以在这个广播中获取用户输入的回复信息,代码如下:

GetMessageReceiver.java

1
2
3
4
5
6
7
8
9
10
11
12
13
14
15
16
17
18
19
20
21
22
23
24
25
26
27
28
29
30
31
32
33
34
35
36
37
38
39
40
41
42
43
44
45
46
47
48
49
50
@Override
public void onReceive(Context context, final Intent intent) {
this.context = context;
//模拟发送消息
new Thread(new Runnable() {
@Override
public void run() {
try {
String replyContent = getMessageText(intent).toString();
Log.i("GetMessageReceiver",replyContent);
Thread.sleep(3000);//设置三秒钟之后更新Notification的状态
updateNotification();
Thread.sleep(3000);//三秒钟后移除Notification
cancalNotification();
} catch (InterruptedException e) {
e.printStackTrace();
}
}
}).start();
}
//获取快捷回复中用户输入的字符串
private CharSequence getMessageText(Intent intent) {
Bundle remoteInput = RemoteInput.getResultsFromIntent(intent);
if (remoteInput != null) {
**//通过KEY_TEXT_REPLY来获取输入的内容**
return remoteInput.getCharSequence(MainActivity.KEY_TEXT_REPLY);
}
return null;
}
//消息发送状态的Notification
private void updateNotification(){
Notification repliedNotification =
new Notification.Builder(context)
.setSmallIcon(R.drawable.ic_account_circle_white_24dp)
.setContentText("消息发送成功!")
.build();
//利用NOTIFICATION_ID同一个ID,更新Notification的内容
notificationManager = (NotificationManager)
context.getSystemService(context.NOTIFICATION_SERVICE);
notificationManager.notify(MainActivity.NOTIFICATION_ID,
repliedNotification);
}
//移除Notification
private void cancalNotification(){
notificationManager.cancel(MainActivity.NOTIFICATION_ID);
}

上述代码是GetMessageReceiver这个广播接收器中的一些操作,并且模拟了发送短信的过程

注意:BroadcastReceiver的生命周期只有十秒钟左右,如果耗时操作时间过长,就会引起ANR,这里是为了简便代码,所以才在BroadcastReceiver中添加了模拟发送信息这个耗时操作,大家以后用到的时候,可以在BroadcastReceiver中开启一个Service,然后在这个Service中进行一些耗时的操作!!!!!!!!!

点击前往Github

好了,到这里为止,整个Android N Notification快速回复的新特性内容已经讲完了,如果有什么不对的地方,欢迎大家指正,谢谢!